Showing posts with label DIY. Show all posts

scenes from my craftosphere.

Posted by Casey // dreams and bones. on Friday, January 13, 2012. Filed under: , , ,
No Comments »


this week i met with a friend
who told me her husband gets the itch


if he doesn't create
if he isn't creative
he feels .. off.
it's not an unproductive feeling,
it's much more.


i told her i knew exactly what she meant.

if i'm not making.. 
it doesn't feel right.

time feels wasted.


so that's what i've been doing this week. 
holing up into my nest
comfy pants on
LOST on the television
and tons and tons and tons of projects.

the more completed in a night, the better.

and that friend?
well she started her own wedding planning business
launched it this week in fact!
and she writes this fantastic blog
where she teaches us not only about centerpieces and table numbers
but getting along,
staying in love,
she's not only teaching us how to plan our weddings,
she's teaching us how to build a strong marriage. 
{i can't help but think about how awesome it is that 
while i get my energy from hands on working, 
she gets hers from writing. kind of amazing how Gifts work.. right?}
if you're planning your own wedding.. be sure to visit her.

xo from henry
and me ;)


DIY: How To Transfer An Image To Canvas

Posted by Casey // dreams and bones. on Wednesday, January 11, 2012. Filed under: , ,
No Comments »

Remember that project I talked about earlier this week?
. . . . . 
It's HERE! And I'm going to show you how to do it!


Pin It

First.. go find yourself a photograph that you love. 


Recently, this image has been floating around Pinterest
and it makes me so dreeeeeamy.
So I printed it out and made this project!

Let's get started. First: go on Photoshop (or whatever image editing software you have) 
and reverse, reverse! 
No, only reverse one time. 
But make sure you do it, because I definitely 
did not the first time and it didn't work out. 
At all.


Now get a gel medium (I used Mod Podge. It's really inexpensive and you can use it for everything!) 
and a paint brush or a sponge brush. Paint the medium on thick - but not too thick!

Next: Lay your image face down on the canvas.


Now get yourself a spoon. or a butter knife. Or both, if you're me.
Do you see those air bubbles? 


Use the spoon and flatten out all of the bubbles.
When most of them are gone, leave the project to dry overnight.

Come back the next day, use a spray bottle and spray the entire piece until your image shows through. 
Now peel (very gently) from the edges or the corners. Be careful not to lift your image off of the page. The paper is layered, and you are peeling the initial layer off.

It looks a little like this! 
(sorry for the poopy picture but the cat was priceless)

You will need to let the image dry for a few hours, or if you're impatient, get a blow dryer. 
When you come back it's going to be almost completely white again. 
Spray it until it is completely wet, and continue to peel the layers away.
When you get to a stopping point, let it dry again. 
Then repeat!

For this project, it only took me 2 or 3 times to revisit before it was done.
Don't worry if you get cracks or rough spots. That adds to the rustic look.. it's good!

When you decide you are done, brush one more layer of Mod Podge
over the entire image to seal it. 
All done!


Friday Photos: wedding and home crafting.

Posted by Casey // dreams and bones. on Monday, January 9, 2012. Filed under: , ,
No Comments »

Nothing beats time to yourself used creatively..

This new project sat eagerly in the corner all night waiting for me to start on it.
{here's a secret.. I messed up.. more on that later}


I quickly finished the lingering project I had been finishing all week long: 
The cover for my late grandmother's bible, which we'll be using to hold our rings at the ceremony.

I attached the yellow fabric to the burlap earlier this week, but the ends of the burlap got rough pretty quickly and began to come apart. DUH. Why didn't I think of that in the first place? I went back last night to sew seams along the edges so the piece holds together.

"with this ring
i thee wed"

so excited for the moment those words actually come out of my mouth. :)


Once I was finished, it was time to work on my new project. 
I began a project called "Transfer your photo to canvas"..

it occurred to me this would be a beautiful way to make prints out of images I love. 
The results look like a distressed image on canvas.

Except I messed up because I didn't think about the "mirror image" - you have to reverse your image before printing in order to transfer it correctly. And I don't have a printer at home.

So up to Fed Ex Office I go.. and I will show you the results soon. :)
(*update* The second try was so successful!! I can't wait to show you! Come back tomorrow for a peak!)

Here's a sneak peek at our guest book quilt pieces.
 I did a little work on those as well. :)

I recently rearranged my living room wall with a pretty arrangement of art. 
I'm hoping to add to the opposite side of the wall with the new prints I will be making this week. 


I'm also hoping to frame those little prints.. but I love the layout for now.

What have you done creatively this week?

A New Tradition: Potato Soup

Posted by Casey // dreams and bones. on Tuesday, January 3, 2012. Filed under: , , , , , ,
2 Comments

Happy new year, all my friends! I hope your holiday season was great. I have a tale to tell you, so pour yourself a glass of leftover eggnog and stay a while.

The night before Christmas, when all through the city, not many a creature were stirring.. not even the rats. But my dear had to work late, so met up we did, at an old fashioned bar with plenty of goods. Stone Pale Ale I had and something fancier had he.. and by the end of the night we were giggly with glee. A Christmas Eve date was had, what a merry night.

We enjoy Hopleaf bar because our beer taste buds are expanding,  and our fascination for craft beer is growing. The best part about it is, very rare beers are available and at inexpensive prices. The bartenders are friendly and the food is delicious too.

B asked me every day for an entire week for potato soup like he had growing up. I thought it would be a fun to incorporate this into our first Christmas together. Unfortunately, Chicago's grocery stores played a funny little trick on me. I thought I saw a sign at our nearest store that stated they'd be open for the holiday (they are for most others). The hustle and bustle of the holidays got the best of me, so I planned to go pick up our ingredients Christmas morning. We were so sad when the stores were closed, as were the other four nearby. So instead, we opted for Chinese. It felt good to know we were part of that "club."


We even found a couple of Christmas movies: National Lampoon's Vegas Vacation, the original Grinch, and Jim Carrey's The Grinch.

Round 1: the Chinese food..


Round 2: the dessert, and the beers. Several of our friends are bakers and gave us delicious baked goods for Christmas. We feasted on these all afternoon long, paired with Bell's Christmas Ale and Half Acre's Big Hugs (which is also made with Dark Matter Coffee).


Also, I taught myself how to crochet! Using this pattern for a crochet beard, I looked up each step on YouTube and went with it. The beard isn't done yet because, well, I'm still learning!


Are you ready for the potato soup action? Here goes.
My mom sent me over this little recipe.

Creamy Potato Soup
Prep: 15 mins Cook: 30 mins Ready: 45 mins

2 tbsp margarine or butter
4 green onions sliced (about 1/2 cup)
1 stalk celery sliced (about 1/2 cup) **we left this out because neither of us are big fans. 
1 can (14 oz) chicken broth **I used organic vegetable broth from Trader Joe's.
1/8 tsp black pepper
3 medium potatoes (about 1 lb) sliced 1/4 inch thick
1 1/2 cups milk

*additions: I grated half of 1 clove of garlic and a small carrot into the soup


Step 1. Add the butter, green onions and celery into the saucepan over medium heat. Cook until tender.

Step two: Chop those potatoes! Maybe this should be step one. I turned the heat off of my saucepan during this step.


Step three: measure out your broth and add it to the saucepan


Step four: add broth, pepper and potatoes to the saucepan. Heat to a boil. Reduce heat to a low, cover and cook for 15 minutes (I had to cook about 20 minutes and next time I'll do 25, but I'll explain later). 


Step five: This is my added step. Grate bits of carrot and garlic into the soup. This is completely optional but resulted in deliciousness. :)


Step six: In a blender or food processor, place half the broth mixture and 3/4 cup milk. Cover and blend until smooth. Repeat with remaining broth mixture and milk. Return to pan. Over medium heat, heat through. Garnish with a small bit of green onion. Note: Since I don't have  a blender or food processor, I had to use a mixer. This is why next time I make the soup, I will cook the potatoes a bit longer. It was very difficult and resulted in a bit chunkier of soup than desired.

Et voila! Delicious potato soup.

No, I don't have any pictures of the soup in the bowl. It was just too delicious, and too quickly eaten. I quickly see this becoming our new Christmas tradition. :)

Happy New Year to you and yours, from us!

Tonight is my Friday..

Posted by Casey // dreams and bones. on Thursday, December 22, 2011. Filed under: , ,
No Comments »

Today I am thankful for working in higher ed. Because I am home free until January 2. :)

what to do .. what to do.. 


I have an idea. ;)

Christmas on the blogs // roundup

Posted by Casey // dreams and bones. on Thursday, December 15, 2011. Filed under: , , ,
No Comments »

Hey y'all..

washi tape ornament tutorial via poppytalk


Well I'm going to be perfectly honest here. Our Christmas this year is very low key. We're sharing the cheer with anyone we come around, but we're not traveling or gift shopping / making. With saving for the wedding and a move, and student loan payments right around the corner, we're just not good St. Nicks this year. I'm looking forward to next year.. I'll be saving some of these gift roundups and starting my gift shopping and creating at the end of the summer. It will be nice to plan for!


garland tutorial via poppytalk

In the mean time, I'm gaining a good amount of Christmas cheer through the devoted bloggers I follow. If you're looking for last minute ideas, or you're just interested in seeing what's out there, take a look at these!

Shop Ruche Holiday Home Guide. Tons of DIYs, and lots of great decorating ideas. Don't miss it!

Poppytalk Handmade Holiday Gift Guide, Decor, Cards and DIYs

What are your favorite holiday posts around the blogs? What are your favorite traditions? Leave me a comment and let me know. :)

Wedding Crafting Progress

Posted by Casey // dreams and bones. on Tuesday, December 13, 2011. Filed under: , , , ,
No Comments »

Here's what I've been up to, aside from hanging Artnog:

First, crafting with my girlfrans and eating an enormous amount of homemade from scratch corn tortilla chips. I'm considering employing my friend as a wholesale corn tortilla chip distributor.. dealing to my chips and salsa addiction. mmmm.

 mmmm so good.

Next... making my groomsmen their boutonnieres.

 The tutorial for this is coming - promise!

Also, I'm working on some wedding details. Little things to make the day more fun for everybody.

can't show you the whole thing yet. :)

for the guest book table

Next up.. I'm learning to crochet ! I think I will start with Crochet School over at Crafty Minx. Want to join me? Just leave a comment and let me know. We can jump on the boat together! 

DIY "Upcycle" ~ how to prepare your everyday jars for crafting.

Posted by Casey // dreams and bones. on Thursday, November 10, 2011. Filed under: , , , ,
No Comments »

Happy Thursday everybody!

I am really excited to share this little tutorial with you. Mostly because if you do this upcycle, you'll save yourself tons of time scouring thrift shops for overpriced old jars. Don't get me wrong, there's an unmatchable charm to those old thrifted jars. But when you have perfectly good ones sitting in your refrigerator or recycling bin waiting to be used, there's no reason not to make the best of them!

Here's a little bit of background: not only do I hope to use mason jars for our centerpieces, but I want each and every guest at our wedding to have one to enjoy their beverages. I just love the aesthetic of it, and it really suits our laid-back barn theme!

It didn't take me long to realize that we were using a lot of jars every week: for salsa, pasta sauce, jam.. even pickles! With decent thrifted jars often priced between $1-6 a piece, and our really small wedding budget, I knew I had to get creative. So I started soaking and peeling labels off of each and every jar when we were finished with it. As a chips and salsa fiend, they have certainly added up quickly. Along with using these jars came an irritating consequence: I couldn't always get the adhesive off of them! Then I figured it out. A simple method our grade school science teachers have always taught us: enter a little oil (to lift the adhesive), add some hot, hot soapy water, and scrub.

Ready to see what happens?


 Here's what you'll need:
1. Two bowls
2. Oil (I chose vegetable oil)
3. Dish soap and hot water
4. Something rough to scrub with (I used Scotch Bright Scrubbers)
5. Jars stuck with adhesive!

Step 1: Fill the first bowl with about 1/4 to 1/2 cup oil. Fill the second bowl almost full with hot, hot water and sudsy dishsoap. It will help to soak your jars in hot water first, or run them under a very hot water faucet. This will loosen the adhesive to begin.

Step 2: Dip your scrubber in the oil  (If this DIY isn't the easiest ever.. I don't know what is!)


Step 3: Scrub every bit of the adhesive as hard as you can with the scrubber.


Step 4: Once your adhesive is completely covered in oil and you've scrubbed as much as you can, place it in the bowl of hot soapy water. Now rinse your scrubber out, and scrub as hard as you can- again! Make sure you are running your fingers over the areas you're scrubbing to see if the adhesive is off.


When you're done, rinse each of them under the faucet with very hot water, and place them in the dishwasher. (Or, if you don't have one.. wash by hand.. I'm sorry!)

The result will be several jars without any adhesive on them. And you'll be one happy crafter, ready to make a jar-lamp, a snowglobe, or a mantle piece. Aren't you excited to see what you can do with your new, clean, upcycled jar? The DIY you will see next week is going to feature a couple of fun projects with jars.

What's your idea of a fun jar craft project? Or-  what's another easy upcycle you like to do? Leave me a comment here to share your ideas! Also-  be sure to check back in a couple of hours when I reveal a very useful tutorial - "how to pay off your debt"!

A Thursday How To ~ Fabric Flowers

Posted by Casey // dreams and bones. on Thursday, November 3, 2011. Filed under: , , , ,
No Comments »

As promised, I want to bring you with me on the DIY adventure to the Burkhart Wedding. On a DIY wedding budget, there isn't much room for extras like florists and caterers. So, you have to get creative. Considering I know next to nothing about flowers, but absolutely adore the feeling created by sunshine yellow, I have been collecting fabrics lately to make flowers. When I took the plunge and began creating these flowers, I truly found the vision of our wedding. These will play a big part of showing our friends and family our creative, laid-back personalities.

Today I'm showing you a fun tutorial to make fabric rosettes. It's rainy and dark here in Chicago, and these fabric flowers are sure to bring some sunshine to your day.

Here's what you'll need:
-a cutting mat
-ruler
-a rotary cutter (or start with some sharp scissors - I'll explain a fun method)
-hot glue gun and glue (or fabric glue)
-fabric

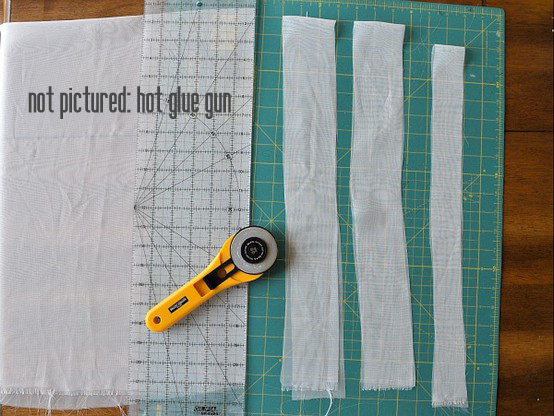
Step 1: Cut your fabric into 2" strips
I use a ruler, mat and a rotary cutter, because I'm really clumsy and can't cut fabric in straight lines like a normal person might. ;) But if you don't have these materials, you can easily make the strips using a sharp pair of scissors (for a precise cut). Just cut a little bit in, and then tear a straight line down the fabric. This will create a 'shabby chic' look later on.

Step 2: Fold fabric in half
Step 3:
Fold in half once again. For flimsier fabrics, it may help to place a dot of glue here, to hold the fabric together. Your fabric should now be about 1/2" wide.


Step 4: Roll the edge up until it is about 1/4"-1/2" wide. Place a dot of glue to hold this - it is the center of your rosette.
Step 5: 
Begin folding the fabric around the center.

  As you are folding it around the center roll, twist it. Place a dot of glue every couple of twists.
The more you twist these, the more you will begin to see your flower form! You can alter the process any way you want to. With less twists you'll have a flatter flower, but with more you will see your flower get fluffier. 

Here's how mine look!

And if you make enough of them, you will have your own bouquet!


Are you curious to see all the ways we'll be incorporating these into our wedding?? I'll give you a hint, they're not just for the centerpieces. I'll be taking custom orders for these soon, in the form of headbands, necklaces, and more. Christmas is on its way. 

What did you think of this tutorial? Would you like to see more? What kinds of crafts are you making lately?