A Thursday How To ~ Fabric Flowers
Posted by Casey // dreams and bones. on Thursday, November 3, 2011. Filed under: DIY, fabric flowers, how to, rosettes, tutorialAs promised, I want to bring you with me on the DIY adventure to the Burkhart Wedding. On a DIY wedding budget, there isn't much room for extras like florists and caterers. So, you have to get creative. Considering I know next to nothing about flowers, but absolutely adore the feeling created by sunshine yellow, I have been collecting fabrics lately to make flowers. When I took the plunge and began creating these flowers, I truly found the vision of our wedding. These will play a big part of showing our friends and family our creative, laid-back personalities.
Today I'm showing you a fun tutorial to make fabric rosettes. It's rainy and dark here in Chicago, and these fabric flowers are sure to bring some sunshine to your day.
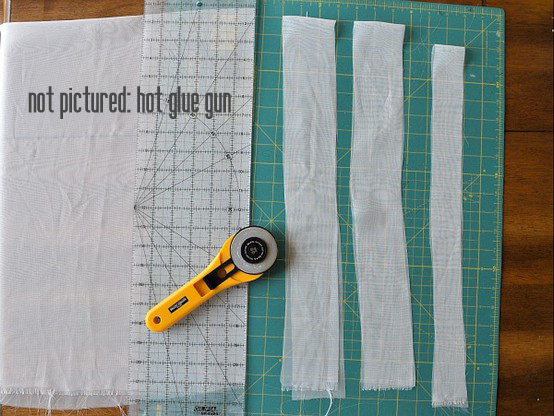
Here's what you'll need:
-a cutting mat
-ruler
-ruler
-a rotary cutter (or start with some sharp scissors - I'll explain a fun method)
-hot glue gun and glue (or fabric glue)
-fabric
Step 1: Cut your fabric into 2" strips
I use a ruler, mat and a rotary cutter, because I'm really clumsy and can't cut fabric in straight lines like a normal person might. ;) But if you don't have these materials, you can easily make the strips using a sharp pair of scissors (for a precise cut). Just cut a little bit in, and then tear a straight line down the fabric. This will create a 'shabby chic' look later on.
I use a ruler, mat and a rotary cutter, because I'm really clumsy and can't cut fabric in straight lines like a normal person might. ;) But if you don't have these materials, you can easily make the strips using a sharp pair of scissors (for a precise cut). Just cut a little bit in, and then tear a straight line down the fabric. This will create a 'shabby chic' look later on.

Step 2: Fold fabric in half

Step 3:
Fold in half once again. For flimsier fabrics, it may help to place a dot of glue here, to hold the fabric together. Your fabric should now be about 1/2" wide.

Step 4: Roll the edge up until it is about 1/4"-1/2" wide. Place a dot of glue to hold this - it is the center of your rosette.

Step 5:
Begin folding the fabric around the center.

As you are folding it around the center roll, twist it. Place a dot of glue every couple of twists.

The more you twist these, the more you will begin to see your flower form! You can alter the process any way you want to. With less twists you'll have a flatter flower, but with more you will see your flower get fluffier.
Here's how mine look!


Are you curious to see all the ways we'll be incorporating these into our wedding?? I'll give you a hint, they're not just for the centerpieces. I'll be taking custom orders for these soon, in the form of headbands, necklaces, and more. Christmas is on its way.
What did you think of this tutorial? Would you like to see more? What kinds of crafts are you making lately?

No Responses to A Thursday How To ~ Fabric Flowers
Leave a Reply